Unit1:
java fundamentals, data type,
operators and control statements
1.1
History and philosophy of java
1.2
Object oriented programming
1.3
Java development kit
1.4
A first simple java program
1.5
Packages in java
1.6
Javas data type
1.6.1
integers
1.6.2
characters
1.6.3
floating point types
1.6.4
strings
1.6.5
arrays
1.6.6
the Boolean type
1.7
literals
1.7.1
hex, octal and binary
1.7.2
character escape sequence
1.7.3
string literals
1.8
variable and constants
1.9
operators
1.10
type casting
1.11
control statements
1.11.1
if statement
1.11.2
switch statement
1.11.3
loop statement
1.11.4
continue statement
1.11.5
break statement
History and philosophy of java:
James Gosling initiated Java language project in June 1991
for use in one of his many set-top box projects. The language, initially called
‘Oak’ after an oak tree that stood outside Gosling's office, also went by the name
‘Green’ and ended up later being renamed as Java, from a list of random words.
Sun released the first public implementation as Java 1.0 in
1995. It promised to Write Once, Run Anywhere (WORA), providing no-cost
run-times on popular platforms.
On 13 November 2006, Sun released much of Java as free and
open source software under the terms of the GNU General Public License (GPL).
On 8 May 2007, Sun finished the process, making all of
Java's core code free and open-source, aside from a small portion of code to
which Sun did not hold the copyright.
Philosophy of Java:
Java is popular
high-level, class-based object oriented programming language originally
developed by Sun Microsystems and released in 1995. Currently Java is owned by
Oracle and more than 3 billion devices run Java. Java runs on a variety of
platforms, such as Windows, Mac OS, and the various versions of UNIX. Java is
used to develop numerious types of software applications like Mobile apps, Web
apps, Desktop apps, Games and much more.
Java is a
general-purpose programming language intended to let programmers write once,
run anywhere (WORA). This means that compiled Java code can run on all
platforms that support Java without the need to recompile.
This Java
Tutorial has been prepared by well experienced Java Programmers for the
Software Engineers to help them understand the basic to advanced concepts of
Java Programming Language. After completing this tutorial, you will find
yourself at a moderate level of expertise in Java, from where you can take
yourself to the next levels.
Object-Oriented Programming:
The word object-oriented is the combination of two words i.e. object and oriented. The dictionary
meaning of the object is an article or entity that exists in the real world.
The meaning of oriented is interested in a particular kind of thing or entity.
In layman's terms, it is a programming pattern that rounds around an object or
entity are called object-oriented
programming.

The technical definition of object-oriented programming is
as follows:
The object-oriented
programming is basically a computer
programming design philosophy or methodology that organizes/ models software
design around data, or objects rather than functions and logic.
An object is referred to as a data field that has unique
attributes and behavior. Everything in OOP is grouped as self-sustainable
objects.
It is the most popular programming model among developers.
It is well suited for programs that are large, complex, and actively updated or
maintained. It simplifies software development and maintenance by providing
major concepts such as abstraction,
inheritance, polymorphism, and encapsulation. These core
concepts support OOP.
A real-world example of OOP is the automobile. It more
completely illustrates the power of object-oriented design.
Java development kit:
The Java Development Kit (JDK)
is a cross-platformed software development environment that offers a collection
of tools and libraries necessary for developing Java-based software
applications and applets. It is a core package used in Java, along with the JVM
(Java Virtual Machine) and the JRE (Java Runtime
Environment).
Beginners often get confused
with JRE and JDK, if you are only interested in running Java programs on your
machine then you can easily do it using Java Runtime Environment. However, if
you would like to develop a Java-based software application then along with JRE
you may need some additional necessary tools, which is called JDK.
JDK=JRE+Development
Tools

Fig: JAVA Development Kit (JDK)
A first simple java program:
Creating Hello World Example
Let's create the hello java program:
- class Simple{
- public static void main(String args[]){
- System.out.println("Hello Java");
- }
- }
Output:
Hello Java
Parameters used in First Java Program
Let's see what is the meaning of class, public, static,
void, main, String[], System.out.println().
- class
keyword is used to declare a class in Java.
- public
keyword is an access modifier that represents visibility. It means it is
visible to all.
- static is
a keyword. If we declare any method as static, it is known as the static
method. The core advantage of the static method is that there is no need
to create an object to invoke the static method. The main() method is
executed by the JVM, so it doesn't require creating an object to invoke
the main() method. So, it saves memory.
- void is
the return type of the method. It means it doesn't return any value.
- main
represents the starting point of the program.
- String[] args or String args[]
is used for command
line argument. We will discuss it in coming section.
- System.out.println() is used to print statement. Here, System is a class, out is an
object of the PrintStream class, println() is a method of the PrintStream
class. We will discuss the internal working of System.out.println()
statement in the coming section.
Packages in java:
Packages are used in Java in order to prevent naming
conflicts, to control access, to make searching/locating and usage of classes,
interfaces, enumerations and annotations easier, etc.
A Package can be defined as a grouping of related
types (classes, interfaces, enumerations and annotations ) providing access
protection and namespace management.
Some of the existing packages in Java are −
· java.lang − bundles the fundamental
classes
· java.io − classes for input , output
functions are bundled in this package
Programmers can define their own packages to bundle group
of classes/interfaces, etc. It is a good practice to group related classes
implemented by you so that a programmer can easily determine that the classes,
interfaces, enumerations, and annotations are related.
Since the package creates a new namespace there won't be
any name conflicts with names in other packages. Using packages, it is easier
to provide access control and it is also easier to locate the related classes.
AD
Creating a Package
While creating a package, you should choose a name for the
package and include a package statement along with that name at the top
of every source file that contains the classes, interfaces, enumerations, and
annotation types that you want to include in the package.
The package statement should be the first line in the
source file. There can be only one package statement in each source file, and
it applies to all types in the file.
If a package statement is not used then the class,
interfaces, enumerations, and annotation types will be placed in the current
default package.
To compile the Java programs with package statements, you
have to use -d option as shown below.
javac -d Destination_folder file_name.java
Then a folder with the given package name is created in the
specified destination, and the compiled class files will be placed in that
folder.
Example
Let us look at an example that creates a package called animals.
It is a good practice to use names of packages with lower case letters to avoid
any conflicts with the names of classes and interfaces.
Following package example contains interface named animals
−
/* File name : Animal.java */
package animals;
interface Animal {
public void eat();
public void travel();
}
Now, let us implement the above interface in the same
package animals −
package animals;
/* File name : MammalInt.java */
public class MammalInt implements Animal {
public void eat() {
System.out.println("Mammal eats");
}
public void travel() {
System.out.println("Mammal travels");
}
public int noOfLegs() {
return 0;
}
public static void main(String args[]) {
MammalInt m = new MammalInt();
m.eat();
m.travel();
}
}
Now compile the java files as shown below −
$ javac -d . Animal.java $ javac -d . MammalInt.java Java
- Basic Datatypes:
Variables are nothing but reserved memory locations to
store values. This means that when you create a variable you reserve some space
in the memory.
Based on the data type of a variable, the operating system
allocates memory and decides what can be stored in the reserved memory.
Therefore, by assigning different data types to variables, you can store
integers, decimals, or characters in these variables.
There are two data types available in Java −
- Primitive Data Types
- Reference/Object Data Types
AD
Primitive Data Types
There are eight primitive datatypes supported by Java.
Primitive datatypes are predefined by the language and named by a keyword. Let
us now look into the eight primitive data types in detail.
byte
· Byte data type is an 8-bit signed two's complement integer
· Minimum value is -128 (-2^7)
· Maximum value is 127 (inclusive)(2^7 -1)
· Default value is 0
· Byte data type is used to save space in large arrays, mainly in
place of integers, since a byte is four times smaller than an integer.
· Example: byte a = 100, byte b = -50
short
· Short data type is a 16-bit signed two's complement integer
· Minimum value is -32,768 (-2^15)
· Maximum value is 32,767 (inclusive) (2^15 -1)
· Short data type can also be used to save memory as byte data type. A
short is 2 times smaller than an integer
· Default value is 0.
· Example: short s = 10000, short r = -20000
int
· Int data type is a 32-bit signed two's complement integer.
· Minimum value is - 2,147,483,648 (-2^31)
· Maximum value is 2,147,483,647(inclusive) (2^31 -1)
· Integer is generally used as the default data type for integral
values unless there is a concern about memory.
· The default value is 0
· Example: int a = 100000, int b = -200000
long
- Long data type is a 64-bit signed two's complement integer
- Minimum value is -9,223,372,036,854,775,808(-2^63)
- Maximum value is 9,223,372,036,854,775,807 (inclusive)(2^63 -1)
- This type is used when a wider range than int is needed
- Default value is 0L
- Example: long a = 100000L, long b = -200000L
float
· Float data type is a single-precision 32-bit IEEE 754 floating point
· Float is mainly used to save memory in large arrays of floating
point numbers
· Default value is 0.0f
· Float data type is never used for precise values such as currency
· Example: float f1 = 234.5f
double
· double data type is a double-precision 64-bit IEEE 754 floating
point
· This data type is generally used as the default data type for
decimal values, generally the default choice
· Double data type should never be used for precise values such as
currency
· Default value is 0.0d
· Example: double d1 = 123.4
boolean
- boolean data type represents one bit of information
- There are only two possible values: true and false
- This data type is used for simple flags that track true/false
conditions
- Default value is false
- Example: boolean one = true
char
- char data type is a single 16-bit Unicode character
- Minimum value is '\u0000' (or 0)
- Maximum value is '\uffff' (or 65,535 inclusive)
- Char data type is used to store any character
- Example: char letterA = 'A'
Reference Datatypes
· Reference variables are created using defined constructors of the
classes. They are used to access objects. These variables are declared to be of
a specific type that cannot be changed. For example, Employee, Puppy, etc.
· Class objects and various type of array variables come under
reference datatype.
· Default value of any reference variable is null.
· A reference variable can be used to refer any object of the declared
type or any compatible type.
· Example: Animal animal = new Animal("giraffe");
AD
Java Literals
A literal is a source code representation of a fixed value.
They are represented directly in the code without any computation.
Literals can be assigned to any primitive type variable.
For example −
byte a = 68;
char a = 'A';
byte, int, long, and short can be expressed in decimal(base
10), hexadecimal(base 16) or octal(base 8) number systems as well.
Prefix 0 is used to indicate octal, and prefix 0x indicates
hexadecimal when using these number systems for literals. For example −
int decimal = 100;
int octal = 0144;
int hexa = 0x64;
String literals in Java are specified like they are in most
other languages by enclosing a sequence of characters between a pair of double
quotes. Examples of string literals are −
Example
"Hello World"
"two\nlines"
"\"This is in quotes\""
String and char types of literals can contain any Unicode
characters. For example −
char a = '\u0001';
String a = "\u0001";
Java language supports few special escape sequences for
String and char literals as well. They are −
|
Notation |
Character represented |
|
\n |
Newline
(0x0a) |
|
\r |
Carriage
return (0x0d) |
|
\f |
Formfeed
(0x0c) |
|
\b |
Backspace
(0x08) |
|
\s |
Space
(0x20) |
|
\t |
tab |
|
\"
|
Double
quote |
|
\' |
Single
quote |
|
\\ |
backslash |
|
\ddd |
Octal
character (ddd) |
|
\uxxxx |
Hexadecimal
UNICODE character (xxxx) |
AD
String:
A string is a special data type in java, where it
contradicts the fact that non-primitive types are defined by programmers. The
string data type is a non-primitive data type but it is predefined in java,
some people also call it a special ninth primitive data type.
This solves the case where a char cannot store multiple
characters, a string data type is used to store the sequence of characters.
Remember that you need to enclose the sequence of text in double-quotes.
|
String s1 = “Hey There“; System.out.println(s1); |
The above snippet will print “Hey There” as expected.
Variable in java
A variable is a temporary data container that stores a
value in memory while the application is running.
There are three
types of variables in java:
1. A local
variable is defined within a function, or method. It’s local to that function’s
scope.
2. An instance
variable is defined within a class, but outside of a class method. It’s local
to the object (an instance of a class).
3. A static
variable is a non-local variable that can be shared among all instances of a
class (objects).
In this
tutorial, to keep things simple, we will cover local variables inside the
‘main()’ function.
We won’t cover functions in this tutorial. For the moment you don’t have to
worry about the ‘main’ function or the class it’s in.
To declare a
variable, we specify its data type, followed by a name and a semicolon to
terminate the statement.
Syntax:
data_type variable_name;
Example:
public class Program {
public static void main(String[] args) {
// variable declaration
int num;
}
}
Constant in java
Constant
is a value that cannot be changed after assigning it. Java does not directly
support the constants. There is an alternative way to define the constants in
Java by using the non-access modifiers static and final.
How to declare constant in Java?
In Java,
to declare any variable as constant, we use static
and final
modifiers. It is also known as non-access modifiers. According to the Java
naming convention the identifier name must be in capital letters.
Static and Final Modifiers
- The purpose to use the static modifier is to manage the memory.
- It also allows the variable to be available without loading any
instance of the class in which it is defined.
- The final modifier represents that the value of the variable
cannot be changed. It also makes the primitive data type immutable or
unchangeable.
The syntax to declare a constant is as follows:
- static final datatype identifier_name=value;
For example, price is a variable that we want to make constant.
- static final double PRICE=432.78;
2.
Where static and final are the non-access modifiers. The
double is the data type and PRICE is the identifier name in which the value
432.78 is assigned.
3.
In the above statement, the static modifier causes
the variable to be available without an instance of its defining class being
loaded and the final modifier makes the variable fixed.
Operators
in Java:
Operator in Java is a
symbol that is used to perform operations. For example: +, -, *, / etc.
There are many types of operators in Java which are given
below:
- Unary Operator,
- Arithmetic Operator,
- Shift Operator,
- Relational Operator,
- Bitwise Operator,
- Logical Operator,
- Ternary Operator and
- Assignment Operator.
Java Operator Precedence
|
Operator Type |
Category |
Precedence |
|
Unary |
postfix |
expr |
|
prefix |
|
|
|
Arithmetic |
multiplicative |
|
|
additive |
|
|
|
Shift |
shift |
|
|
Relational |
comparison |
|
|
equality |
|
|
|
Bitwise |
bitwise AND |
|
|
bitwise exclusive OR |
|
|
|
bitwise inclusive OR |
|
|
|
Logical |
logical AND |
|
|
logical OR |
|
|
|
Ternary |
ternary |
|
|
Assignment |
assignment |
|
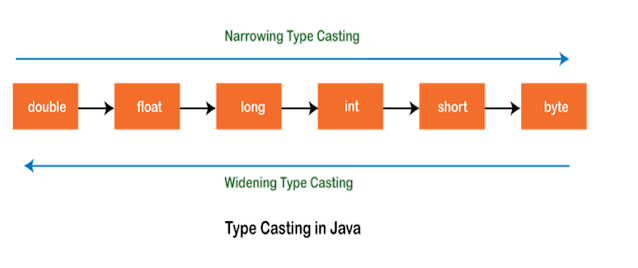
Type
Casting in Java:
In Java, type casting is a method or process that converts a data type into another data
type in both ways manually and automatically. The automatic conversion is done
by the compiler and manual conversion performed by the programmer. In this
section, we will discuss type casting and its types with proper examples.
Type casting
Convert a value from one data type to another data type is
known as type casting.
Types of Type Casting
There are two types of type casting:
- Widening Type Casting
- Narrowing Type Casting
Widening Type Casting
Converting a lower data type into a higher one is called widening type casting. It is
also known as implicit conversion or casting down. It is done automatically. It is safe because there is no chance to
lose data. It takes place when:
- Both data types must be compatible with each other.
- The target type must be larger than the source type.
- byte -> short -> char -> int -> long -> float -> double
For example, the conversion between numeric data type to
char or Boolean is not done automatically. Also, the char and Boolean data
types are not compatible with each other. Let's see an example.
WideningTypeCastingExample.java
- public class WideningTypeCastingExample
- {
- public static void main(String[] args)
- {
- int x = 7;
- //automatically converts the integer type into long type
- long y = x;
- //automatically converts the long type into float type
- float z = y;
- System.out.println("Before conversion, int value "+x);
- System.out.println("After conversion, long value "+y);
- System.out.println("After conversion, float value "+z);
- }
- }
Output
AD
Before conversion, the value is: 7After conversion, the long value is: 7After conversion, the float value is: 7.0
In the above example, we have taken a variable x and
converted it into a long type. After that, the long type is converted into the
float type.
Narrowing Type Casting
Converting a higher data type into a lower one is called narrowing type casting. It is
also known as explicit conversion or casting up. It is done manually by the programmer. If we do not perform
casting then the compiler reports a compile-time error.
- double -> float -> long -> int -> char -> short -> byte
Let's see an example of narrowing type casting.
In the following example, we have performed the narrowing
type casting two times. First, we have converted the double type into long data
type after that long data type is converted into int type.
NarrowingTypeCastingExample.java
- public class NarrowingTypeCastingExample
- {
- public static void main(String args[])
- {
- double d = 166.66;
- //converting double data type into long data type
- long l = (long)d;
- //converting long data type into int data type
- int i = (int)l;
- System.out.println("Before conversion: "+d);
- //fractional part lost
- System.out.println("After conversion into long type: "+l);
- //fractional part lost
- System.out.println("After conversion into int type: "+i);
- }
- }
Output
Before conversion: 166.66After conversion into long type: 166After conversion into int type: 166
Java
Control Statements | Control Flow in Java:
Java compiler executes the code from top to bottom. The
statements in the code are executed according to the order in which they
appear. However, Java
provides statements that can be used to control the flow of Java code. Such
statements are called control flow statements. It is one of the fundamental
features of Java, which provides a smooth flow of program.
Java provides three types of control flow statements.
- Decision Making statements
- if statements
- switch statement
- Loop statements
- do while loop
- while loop
- for loop
- for-each loop
- Jump statements
- break statement
- continue statement
Decision-Making statements:
As the name suggests, decision-making statements decide
which statement to execute and when. Decision-making statements evaluate the
Boolean expression and control the program flow depending upon the result of
the condition provided. There are two types of decision-making statements in
Java, i.e., If statement and switch statement.
1) If Statement:
In Java, the "if" statement is used to evaluate a
condition. The control of the program is diverted depending upon the specific
condition. The condition of the If statement gives a Boolean value, either true
or false. In Java, there are four types of if-statements given below.
- Simple if statement
- if-else statement
- if-else-if ladder
- Nested if-statement
Let's understand the if-statements one by one.
1) Simple if statement:
It is the most basic statement among all control flow
statements in Java. It evaluates a Boolean expression and enables the program
to enter a block of code if the expression evaluates to true.
Syntax of if statement is given below.
- if(condition) {
- statement 1; //executes when condition is true
- }
Consider the following example in which we have used the if statement in the java code.
AD
Student.java
Student.java
- public class Student {
- public static void main(String[] args) {
- int x = 10;
- int y = 12;
- if(x+y > 20) {
- System.out.println("x + y is greater than 20");
- }
- }
- }
Output:
x + y is greater than 20
2) if-else statement
The if-else
statement is an extension to the if-statement, which uses another
block of code, i.e., else block. The else block is executed if the condition of
the if-block is evaluated as false.
Syntax:
- if(condition) {
- statement 1; //executes when condition is true
- }
- else{
- statement 2; //executes when condition is false
- }
Consider the following example.
AD
Student.java
- public class Student {
- public static void main(String[] args) {
- int x = 10;
- int y = 12;
- if(x+y < 10) {
- System.out.println("x + y is less than 10");
- } else {
- System.out.println("x + y is greater than 20");
- }
- }
- }
Output:
x + y is greater than 20
3) if-else-if ladder:
The if-else-if statement contains the if-statement followed
by multiple else-if statements. In other words, we can say that it is the chain
of if-else statements that create a decision tree where the program may enter
in the block of code where the condition is true. We can also define an else
statement at the end of the chain.
Syntax of if-else-if statement is given below.
- if(condition 1) {
- statement 1; //executes when condition 1 is true
- }
- else if(condition 2) {
- statement 2; //executes when condition 2 is true
- }
- else {
- statement 2; //executes when all the conditions are false
- }
Consider the following example.
Student.java
- public class Student {
- public static void main(String[] args) {
- String city = "Delhi";
- if(city == "Meerut") {
- System.out.println("city is meerut");
- }else if (city == "Noida") {
- System.out.println("city is noida");
- }else if(city == "Agra") {
- System.out.println("city is agra");
- }else {
- System.out.println(city);
- }
- }
- }
Output:
Delhi
4. Nested if-statement
In nested if-statements, the if statement can contain a if or if-else statement inside
another if or else-if statement.
Syntax of Nested if-statement is given below.
- if(condition 1) {
- statement 1; //executes when condition 1 is true
- if(condition 2) {
- statement 2; //executes when condition 2 is true
- }
- else{
- statement 2; //executes when condition 2 is false
- }
- }
Consider the following example.
AD
Student.java
- public class Student {
- public static void main(String[] args) {
- String address = "Delhi, India";
-
- if(address.endsWith("India")) {
- if(address.contains("Meerut")) {
- System.out.println("Your city is Meerut");
- }else if(address.contains("Noida")) {
- System.out.println("Your city is Noida");
- }else {
- System.out.println(address.split(",")[0]);
- }
- }else {
- System.out.println("You are not living in India");
- }
- }
- }
Output:
Delhi
Switch Statement:
In Java, Switch
statements are similar to if-else-if statements. The switch
statement contains multiple blocks of code called cases and a single case is
executed based on the variable which is being switched. The switch statement is
easier to use instead of if-else-if statements. It also enhances the
readability of the program.
Points to be noted about switch statement:
- The case variables can be int, short, byte, char, or
enumeration. String type is also supported since version 7 of Java
- Cases cannot be duplicate
- Default statement is executed when any of the case doesn't
match the value of expression. It is optional.
- Break statement terminates the switch block when the condition
is satisfied.
It is optional, if not used, next case is executed. - While using switch statements, we must notice that the case
expression will be of the same type as the variable. However, it will also
be a constant value.
The syntax to use the switch statement is given below.
1. switch(expression) {
2. case x:
3. // code block
4. break;
5. case y:
6. // code block
7. break;
8. default:
9. // code block
10. }
Consider the following example to understand the flow of
the switch statement.
Student.java
public class Main {
public static void main(String[] args) {
int day = 4;
switch (day) {
case 1:
System.out.println("Monday");
break;
case 2:
System.out.println("Tuesday");
break;
case 3:
System.out.println("Wednesday");
break;
case 4:
System.out.println("Thursday");
break;
}
}
}
Output:
Thursday
While using switch statements, we must notice that the case
expression will be of the same type as the variable. However, it will also be a
constant value. The switch permits only int, string, and Enum type variables to
be used.
Loop Statements
Loops can execute a block of code as long as
a specified condition is reached.
Loops are handy because they save time,
reduce errors, and they make code more readable.
In Java, we have three types of loops that execute
similarly. However, there are differences in their syntax and condition
checking time.
- for loop
- while loop
- do-while loop
Let's understand the loop statements one by one.
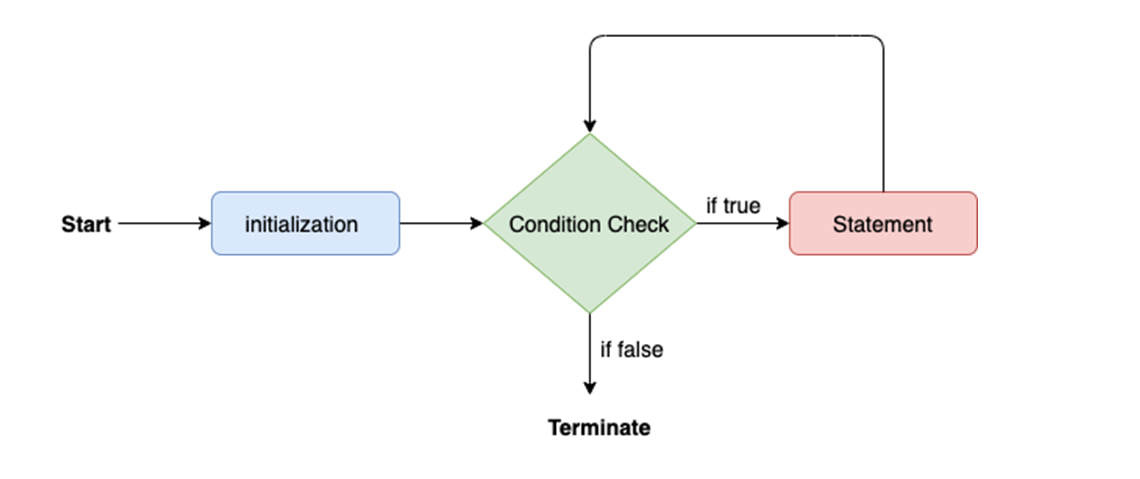
Java for loop
When you know exactly how many times you want to
loop through a block of code, use the for loop instead of a while loop:
Syntax
for(statement1;statement2;statement3){
// code block to be executed
}
The flow chart for the for-loop is given below.
Consider the following example to understand the proper
functioning of the for loop in java.
Calculation.java
public class Main {
public static void main(String[]
args) {
for (int i = 0; i < 5; i++)
{
System.out.println(i);
}
}
}
Output:
0
1
2
3
4
Another Example
public class Main {
public static void main(String[] args) {
for (int i = 0; i <= 10; i = i + 2) {
System.out.println(i);
}
}
}
Output
0
2
4
6
8
10
Nested Loops
It is
also possible to place a loop inside another loop. This is called a nested
loop.
The
"inner loop" will be executed one time for each iteration of the
"outer loop":
Example
public class Main {
public static void main(String[] args) {
// Outer loop.
for (int i = 1; i <= 2; i++) {
System.out.println("Outer: " + i); // Executes 2 times
// Inner loop
for (int j = 1; j <= 3; j++) {
System.out.println(" Inner: " + j); // Executes 6 times (2 *
3)
}
}
}
}
Output
Outer: 1
Inner: 1
Inner: 2
Inner: 3
Outer: 2
Inner: 1
Inner: 2
Inner: 3
Java for-each loop
Java provides an enhanced for loop to traverse the data
structures like array or collection. In the for-each loop, we don't need to
update the loop variable.
The syntax to use the for-each loop in java is given below.
for (type variableName : arrayName) {
// code block to be executed
}
Consider the following example to understand the
functioning of the for-each loop in Java.
Main.java
1.
public class Main {
2.
public static void
main(String[] args) {
3.
String[] name = {{"Java","C","C++","Python","JavaScript"};
4.
for (String i : name) {
5.
System.out.println(i);
6.
}
7.
}
8.
}
Output:
Printing the content of the array names: JavaCC++PythonJavaScript
Java while loop
The while loop loops through a block
of code as long as a specified condition is true:
The syntax of the while loop is given below.
- while(condition){
- //looping statements
- }
The flow chart for the while loop is given in the following
image.

Consider the following example.
Calculation .java
- public class Calculation {
- public static void main(String[] args) {
- // TODO Auto-generated method stub
- int i = 0;
- System.out.println("Printing the list of first 10 even numbers \n");
- while(i<=10) {
- System.out.println(i);
- i = i + 2;
- }
- }
- }
Output:
Printing the list of first 10 even numbers 0246810
Java do-while loop
The do/while loop is a variant of the while loop. This loop will execute the code block once,
before checking if the condition is true, then it will repeat the loop as long
as the condition is true.
It is also known as the exit-controlled loop since the
condition is not checked in advance. The syntax of the do-while loop is given
below.
- do
- {
- //statements
- } while (condition);
The flow chart of the do-while loop is given in the following image.

Consider the following example to understand the
functioning of the do-while loop in Java.
Calculation.java
- public class Calculation {
- public static void main(String[] args) {
- // TODO Auto-generated method stub
- int i = 0;
- System.out.println("Printing the list of first 10 even numbers \n");
- do {
- System.out.println(i);
- i = i + 2;
- }while(i<=10);
- }
- }
Output:
Printing the list of first 10 even numbers 0246810
Jump Statements
Jump statements are used to transfer the control of the
program to the specific statements. In other words, jump statements transfer
the execution control to the other part of the program. There are two types of
jump statements in Java, i.e., break and continue.
Java break statement
As the name suggests, the break statement
is used to break the current flow of the program and transfer the control to
the next statement outside a loop or switch statement. However, it breaks only
the inner loop in the case of the nested loop.
The break statement cannot be used independently in the
Java program, i.e., it can only be written inside the loop or switch statement.
The break statement example with for loop
Consider the following example in which we have used the
break statement with the for loop.
BreakExample.java
- public class BreakExample {
-
- public static void main(String[] args) {
- // TODO Auto-generated method stub
- for(int i = 0; i<= 10; i++) {
- System.out.println(i);
- if(i==6) {
- break;
- }
- }
- }
- }
Output:
0123456
break statement example with labeled for
loop
Calculation.java
- public class Calculation {
-
- public static void main(String[] args) {
- // TODO Auto-generated method stub
- a:
- for(int i = 0; i<= 10; i++) {
- b:
- for(int j = 0; j<=15;j++) {
- c:
- for (int k = 0; k<=20; k++) {
- System.out.println(k);
- if(k==5) {
- break a;
- }
- }
- }
-
- }
- }
-
-
- }
Output:
012345
Java continue statement
Unlike break statement, the continue statement
doesn't break the loop, whereas, it skips the specific part of the loop and
jumps to the next iteration of the loop immediately.
Consider the following example to understand the
functioning of the continue statement in Java.
- public class ContinueExample {
-
- public static void main(String[] args) {
- // TODO Auto-generated method stub
-
- for(int i = 0; i<= 2; i++) {
-
- for (int j = i; j<=5; j++) {
-
- if(j == 4) {
- continue;
- }
- System.out.println(j);
- }
- }
- }
-
- }
Output:
012351235235


No comments:
Post a Comment