Unit 6: introducing swing and java database
connectivity(JDBC)
8+12
6.1 Design philosophy of swing
6.2 Components and Containers
6.3 Layout Managers
6.4 Swing event handling
6.5 Basic swing components: JButton,
JTextField, JCheckBox, JList
6.6 Use Anonymous Inner Classes to Handle
Events
What is Swing in Java?
Swing in Java is a
Graphical User Interface (GUI) toolkit that includes the GUI components. Swing
provides a rich set of widgets and packages to make sophisticated GUI
components for Java applications. Swing is a part of Java Foundation
Classes(JFC), which is an API for Java GUI programing that provide GUI.
The Java Swing library is built on top of the Java Abstract
Widget Toolkit (AWT), an older, platform dependent GUI
toolkit. You can use the Java simple GUI programming components like button,
textbox, etc., from the library and do not have to create the components from
scratch.
Java Swing class Hierarchy Diagram
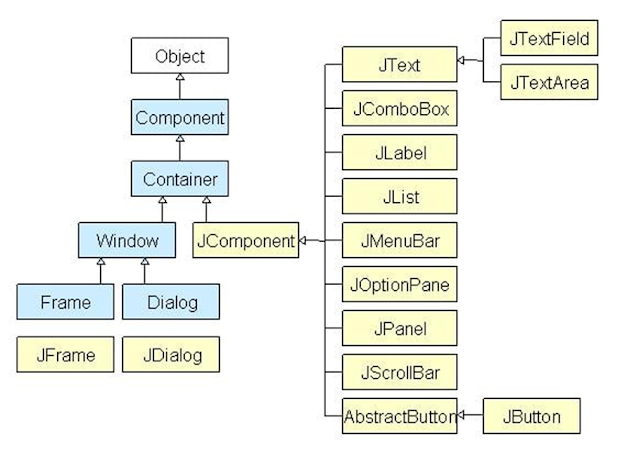
Swing
Class Hierarchy Diagram
All components in Java Swing are JComponent which can be
added to container classes.
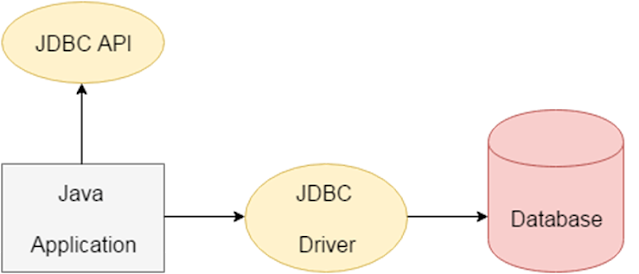
JDBC stands for
Java Database Connectivity. JDBC is a Java API to connect and execute the query
with the database. It is a part of JavaSE (Java Standard Edition). JDBC API
uses JDBC drivers to connect with the database. There are four types of JDBC
drivers:
- JDBC-ODBC
Bridge Driver,
- Native
Driver,
- Network
Protocol Driver, and
- Thin
Driver
We have
discussed the above four drivers in the next chapter.
We can use JDBC
API to access tabular data stored in any relational database. By the help of
JDBC API, we can save, update, delete and fetch data from the database. It is
like Open Database Connectivity (ODBC) provided by Microsoft.
The current
version of JDBC is 4.3. It is the stable release since 21st September, 2017. It
is based on the X/Open SQL Call Level Interface. The java.sql package
contains classes and interfaces for JDBC API. A list of popular interfaces
of JDBC API are given below:
- Driver
interface
- Connection
interface
- Statement
interface
- PreparedStatement
interface
- CallableStatement
interface
- ResultSet
interface
- ResultSetMetaData
interface
- DatabaseMetaData
interface
- RowSet
interface
A list of
popular classes of JDBC API are given below:
- DriverManager
class
- Blob class
- Clob class
- Types
class
Before JDBC,
ODBC API was the database API to connect and execute the query with the
database. But, ODBC API uses ODBC driver which is written in C language (i.e.
platform dependent and unsecured). That is why Java has defined its own API
(JDBC API) that uses JDBC drivers (written in Java language).
We can use JDBC
API to handle database using Java program and can perform the following
activities:
- Connect to
the database
- Execute
queries and update statements to the database
- Retrieve
the result received from the database.
Components
Components, in Java, refer to the basic elements that form
the user interface. These elements are responsible for rendering specific
functionalities or features on the screen. Common examples of components
include buttons, labels, text fields, checkboxes, radio buttons, sliders, and
more. Each component represents a specific user interface control with specific
behaviors and attributes. Components can be interactive or non-interactive,
depending on their nature.
Key characteristics of components include:
- Visual Representation: Components have a visual representation on the screen and can
be seen and interacted with by users.
- Events and Listeners: Components can generate events when certain actions occur
(e.g., button click, text input), and developers can attach event
listeners to respond to these events.
- Customizability: Components often have customizable properties, such as size,
color, font, and alignment, which allow developers to tailor their
appearance.
- Reusability: Components are designed to be reusable, making it easy to
include the same or similar elements across multiple parts of an
application.
- Hierarchical: Components can be combined in a hierarchical structure,
allowing complex UI layouts.
Containers
Containers, on the other hand, are components that serve as
a holding space for other components. In essence, containers are responsible
for organizing and managing the layout of their child components. They provide
structure and help create complex UI designs by defining how components are
positioned and displayed within them.
Key characteristics of containers include:
- Nested Structure: Containers can contain other containers, forming a nested
structure that enables the creation of intricate UI layouts.
- Layout Management: Containers utilize layout managers to define the rules for
arranging their child components. Layout managers determine the
positioning and sizing of components within the container, ensuring
consistent appearance across different screen sizes and resolutions.
- No Direct User Interaction: Unlike regular components, containers are not meant to be
interacted with directly by users. They are more of an organizational tool
for other components.
- Swing and AWT: In Java, containers are mainly associated with AWT (Abstract
Window Toolkit) and Swing, the two standard GUI libraries. AWT containers
include classes like Frame, Panel, and Window, while Swing containers are
represented by classes like JFrame, JPanel, and JWindow.
LayoutManagers
The
LayoutManagers are used to arrange components in a particular manner. The Java
LayoutManagers facilitates us to control the positioning and size of the
components in GUI forms. LayoutManager is an interface that is implemented by
all the classes of layout managers. There are the following classes that
represent the layout managers:
- java.awt.BorderLayout
- java.awt.FlowLayout
- java.awt.GridLayout
- java.awt.CardLayout
- java.awt.GridBagLayout
- javax.swing.BoxLayout
- javax.swing.GroupLayout
- javax.swing.ScrollPaneLayout
- javax.swing.SpringLayout
etc.
Java BorderLayout
The
BorderLayout is used to arrange the components in five regions: north, south,
east, west, and center. Each region (area) may contain one component only. It
is the default layout of a frame or window. The BorderLayout provides five
constants for each region:
- public
static final int NORTH
- public
static final int SOUTH
- public
static final int EAST
- public
static final int WEST
- public
static final int CENTER
Constructors of BorderLayout class:
- BorderLayout(): creates a
border layout but with no gaps between the components.
- BorderLayout(int
hgap, int vgap): creates a border layout with the given horizontal
and vertical gaps between the components.
Example of BorderLayout class: Using BorderLayout()
constructor
FileName: Border.java
- import java.awt.*;
- import javax.swing.*;
-
- public class Border
- {
- JFrame f;
- Border()
- {
- f = new JFrame();
-
- // creating buttons
- JButton b1 = new JButton("NORTH");; // the button will be labeled as NORTH
- JButton b2 = new JButton("SOUTH");; // the button will be labeled as SOUTH
- JButton b3 = new JButton("EAST");; // the button will be labeled as EAST
- JButton b4 = new JButton("WEST");; // the button will be labeled as WEST
- JButton b5 = new JButton("CENTER");; // the button will be labeled as CENTER
-
- f.add(b1, BorderLayout.NORTH); // b1 will be placed in the North Direction
- f.add(b2, BorderLayout.SOUTH); // b2 will be placed in the South Direction
- f.add(b3, BorderLayout.EAST); // b2 will be placed in the East Direction
- f.add(b4, BorderLayout.WEST); // b2 will be placed in the West Direction
- f.add(b5, BorderLayout.CENTER); // b2 will be placed in the Center
-
- f.setSize(300, 300);
- f.setVisible(true);
- }
- public static void main(String[] args) {
- new Border();
- }
- }
Output:

Event and Listener (Java Event Handling)
|
Changing the state of an object is known
as an event. For example, click on button, dragging mouse etc. The
java.awt.event package provides many event classes and Listener interfaces
for event handling. |
Java Event classes and Listener interfaces
|
Event Classes |
Listener Interfaces |
|
ActionEvent |
ActionListener |
|
MouseEvent |
MouseListener and MouseMotionListener |
|
MouseWheelEvent |
MouseWheelListener |
|
KeyEvent |
KeyListener |
|
ItemEvent |
ItemListener |
|
TextEvent |
TextListener |
|
AdjustmentEvent |
AdjustmentListener |
|
WindowEvent |
WindowListener |
|
ComponentEvent |
ComponentListener |
|
ContainerEvent |
ContainerListener |
|
FocusEvent |
FocusListener |
Steps to perform Event Handling
Following steps are required to perform event handling:
- Register the component with the Listener
Registration Methods
For registering the component with the Listener, many
classes provide the registration methods. For example:
- Button
- public void addActionListener(ActionListener a){}
- MenuItem
- public void addActionListener(ActionListener a){}
- TextField
- public void addActionListener(ActionListener a){}
- public void addTextListener(TextListener a){}
- TextArea
- public void addTextListener(TextListener a){}
- Checkbox
- public void addItemListener(ItemListener a){}
- Choice
- public void addItemListener(ItemListener a){}
- List
- public void addActionListener(ActionListener a){}
- public void addItemListener(ItemListener a){}
Java Event Handling Code
We can put the event handling code into one of the following
places:
- Within class
- Other class
- Anonymous class
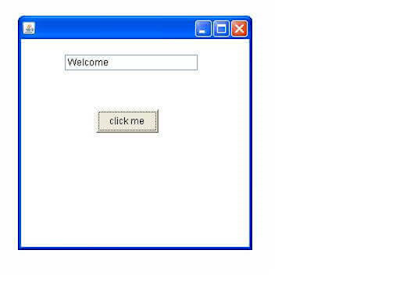
Java event handling by implementing ActionListener
- import java.awt.*;
- import java.awt.event.*;
- class AEvent extends Frame implements ActionListener{
- TextField tf;
- AEvent(){
-
- //create components
- tf=new TextField();
- tf.setBounds(60,50,170,20);
- Button b=new Button("click me");
- b.setBounds(100,120,80,30);
-
- //register listener
- b.addActionListener(this);//passing current instance
-
- //add components and set size, layout and visibility
- add(b);add(tf);
- setSize(300,300);
- setLayout(null);
- setVisible(true);
- }
- public void actionPerformed(ActionEvent e){
- tf.setText("Welcome");
- }
- public static void main(String args[]){
- new AEvent();
- }
- }
public void setBounds(int xaxis, int yaxis, int
width, int height); have been used in the
above example that sets the position of the component it may be button,
textfield etc.
2) Java event handling by outer class
- import java.awt.*;
- import java.awt.event.*;
- class AEvent2 extends Frame{
- TextField tf;
- AEvent2(){
- //create components
- tf=new TextField();
- tf.setBounds(60,50,170,20);
- Button b=new Button("click me");
- b.setBounds(100,120,80,30);
- //register listener
- Outer o=new Outer(this);
- b.addActionListener(o);//passing outer class instance
- //add components and set size, layout and visibility
- add(b);add(tf);
- setSize(300,300);
- setLayout(null);
- setVisible(true);
- }
- public static void main(String args[]){
- new AEvent2();
- }
- }
- import java.awt.event.*;
- class Outer implements ActionListener{
- AEvent2 obj;
- Outer(AEvent2 obj){
- this.obj=obj;
- }
- public void actionPerformed(ActionEvent e){
- obj.tf.setText("welcome");
- }
- }
3) Java event handling by anonymous class
- import java.awt.*;
- import java.awt.event.*;
- class AEvent3 extends Frame{
- TextField tf;
- AEvent3(){
- tf=new TextField();
- tf.setBounds(60,50,170,20);
- Button b=new Button("click me");
- b.setBounds(50,120,80,30);
-
- b.addActionListener(new ActionListener(){
- public void actionPerformed(){
- tf.setText("hello");
- }
- });
- add(b);add(tf);
- setSize(300,300);
- setLayout(null);
- setVisible(true);
- }
- public static void main(String args[]){
- new AEvent3();
- }
- }
What is Java Swing?
Java Swing is a popular and powerful Graphical User
Interface (GUI) toolkit that is used for developing desktop applications. It is
a part of the Java Foundation Classes (JFC) and provides a rich set of
components and layout managers for creating a variety of GUIs. Java Swing is
platform-independent and can be used on any operating system that supports
Java.
It provides a set of lightweight components that are not
only easy to use but also customizable. Some of the commonly used components in
Swing are buttons, text fields, labels, menus, and many more.
Java Swing provides a pluggable look and feels that allows
developers to customize the GUI according to the user’s preferences. It also
provides a robust event-handling mechanism that allows developers to handle
events generated by the graphical components.
Some of the commonly used layout managers in Java Swing are
BorderLayout, FlowLayout, GridLayout, CardLayout, and BoxLayout. These layout
managers allow developers to create complex and intuitive GUIs that are easy to
use and navigate.
Java Swing Class Hierarchy
The Java Swing
API hierarchy is shown below:

Java Swing Packages
Some of the
commonly used packages in Java Swing are:
- javax.swing: This
package contains the core components of Swing, such as JButton, JLabel,
JTable, JList, and many more. It also contains the classes for creating
top-level containers such as JFrame and JDialog.
- javax.swing.event: This
package contains the classes for handling events generated by the Swing
components. It includes event listener interfaces, event adapter classes,
and event objects.
- javax.swing.border: This
package contains classes for creating borders around the Swing components.
It includes the classes for creating line borders, etched borders, and
titled borders.
- javax.swing.layout: This
package contains the classes for creating and managing layout managers in
Swing. It includes the commonly used layout managers such as BorderLayout,
FlowLayout, GridLayout, BoxLayout, and CardLayout.
- javax.swing.plaf: This
package contains the classes for the pluggable look and feels feature of
Swing. It includes the classes for creating and managing the look and feel
themes, and also provides the default look and feel theme for each
platform.
- javax.swing.text: This
package contains the classes for creating and managing text components in
Swing. It includes classes for creating text fields, text areas, and other
text-related components.
- javax.swing.table: This
package contains the classes for creating and managing tables in Swing. It
includes the classes for creating JTable, TableModel, TableColumn, and
TableCellRenderer.
Components of Java Swing
Some of the
important and common components of the Java Swing class are:
- JFrame: JFrame is
a top-level container that represents the main window of a GUI
application. It provides a title bar, and minimizes, maximizes, and closes
buttons.
- JPanel: JPanel is
a container that can hold other components. It is commonly used to group
related components together.
- JButton: JButton
is a component that represents a clickable button. It is commonly used to
trigger actions in a GUI application.
- JLabel: JLabel is
a component that displays text or an image. It is commonly used to provide
information or to label other components.
- JTextField:
JTextField is a component that allows the user to input text. It is
commonly used to get input from the user, such as a name or an address.
- JCheckBox: JCheckBox
is a component that represents a checkbox. It is commonly used to get a
binary input from the user, such as whether or not to enable a feature.
- JList: JList is
a component that represents a list of elements. It is typically used to
display a list of options from which the user can select one or more
items.
- JTable: JTable is
a component that represents a data table. It is typically used to present
data in a tabular fashion, such as a list of products or a list of orders.
- JScrollPane:
JScrollPane is a component that provides scrolling functionality to other
components. It is commonly used to add scrolling to a panel or a table.
Java Anonymous inner class
Java anonymous inner class is an inner class without a name
and for which only a single object is created. An anonymous inner class can be
useful when making an instance of an object with certain "extras"
such as overloading methods of a class or interface, without having to actually
subclass a class.
In simple words, a class that has no name is known as an
anonymous inner class in Java. It should be used if you have to override a
method of class or interface. Java Anonymous inner class can be created in two
ways:
- Class (may be abstract or concrete).
- Interface
Java anonymous inner class example using class
TestAnonymousInner.java
- abstract class Person{
- abstract void eat();
- }
- class TestAnonymousInner{
- public static void main(String args[]){
- Person p=new Person(){
- void eat(){System.out.println("nice fruits");}
- };
- p.eat();
- }
- }
Output:
nice fruitsInternal working of given code
- Person p=new Person(){
- void eat(){System.out.println("nice fruits");}
- };
- A class is created, but its name is decided by the compiler,
which extends the Person class and provides the implementation of the
eat() method.
- An object of the Anonymous class is created that is referred to
by 'p,' a reference variable of Person type.
Internal class generated by the compiler
- import java.io.PrintStream;
- static class TestAnonymousInner$1 extends Person
- {
- TestAnonymousInner$1(){}
- void eat()
- {
- System.out.println("nice fruits");
- }
- }
Java anonymous inner class example using interface
- interface Eatable{
- void eat();
- }
- class TestAnnonymousInner1{
- public static void main(String args[]){
- Eatable e=new Eatable(){
- public void eat(){System.out.println("nice fruits");}
- };
- e.eat();
- }
- }
Output:
nice fruitsInternal working of given code
It performs two main tasks behind this code:
- Eatable p=new Eatable(){
- void eat(){System.out.println("nice fruits");}
- };
- A class is created, but its name is decided by the compiler,
which implements the Eatable interface and provides the implementation of
the eat() method.
- An object of the Anonymous class is created that is referred to
by 'p', a reference variable of the Eatable type.
Internal class generated by the compiler
- import java.io.PrintStream;
- static class TestAnonymousInner1$1 implements Eatable
- {
- TestAnonymousInner1$1(){}
- void eat(){System.out.println("nice fruits");}
- }


No comments:
Post a Comment